
home page
February 15, 2015
I woke up shortly after the crack of dawn and forced down a couple slices of stiff cold pizza. It was nice to finally start moving my body around after having it curled up in a bag for 13 hours. Gusts of heavy wind rocked the tent back and forth as I packed everything up. By sunrise, everything was ready to go. It was time to hit the ridge!
sunrise from Silver Saddle


The ridge to Red Peak started out rocky with gradual undulations, then became snow-covered and corniced. After climbing in the shade for roughly 15 minutes, I climbed up to a notch just below the summit, and was temporarily blinded by the sudden sunlight. The bright white light cleared a couple seconds later, revealing the magnificent northeast face of Lois Peak. It was as if the entire face was made of ice.
Red Peak ahead

first view of Lois Peak's northeast face


The last ~40 ft to the summit of Red Peak involved postholing on a 45+ degree slope.

From Red Peak, I could see the heavily corniced ridge connecting Red to Lois Peak to the southeast. To the northeast, the deep blue waters of Lake Tahoe were just visible.
view northeast from Red Peak

southeast


register

The traverse from Red to Lois was somewhat tedious class 1-2 terrain. I mostly stayed on the very crest of the ridge, deviating several times by a few feet when the cornices looked too sketchy.


Lois Peak straight ahead

view southeast from Lois Peak


Next up were two small peaks which I had dubbed the "Crystal Nipples." The ridge between Lois Peak and the northern Nipple was straightforward and mostly class 1.
heading over to North Nipple


looking southeast from North Nipple summit

Descending North Nipple's short southeast ridge involved some class 3 downclimbing to a notch between North and South Nipple. I mainly stayed on the west (right) side of the ridge for this descent. The following short climb up South Nipple was straightforward class 2.
the notch

view southeast from South Nipple

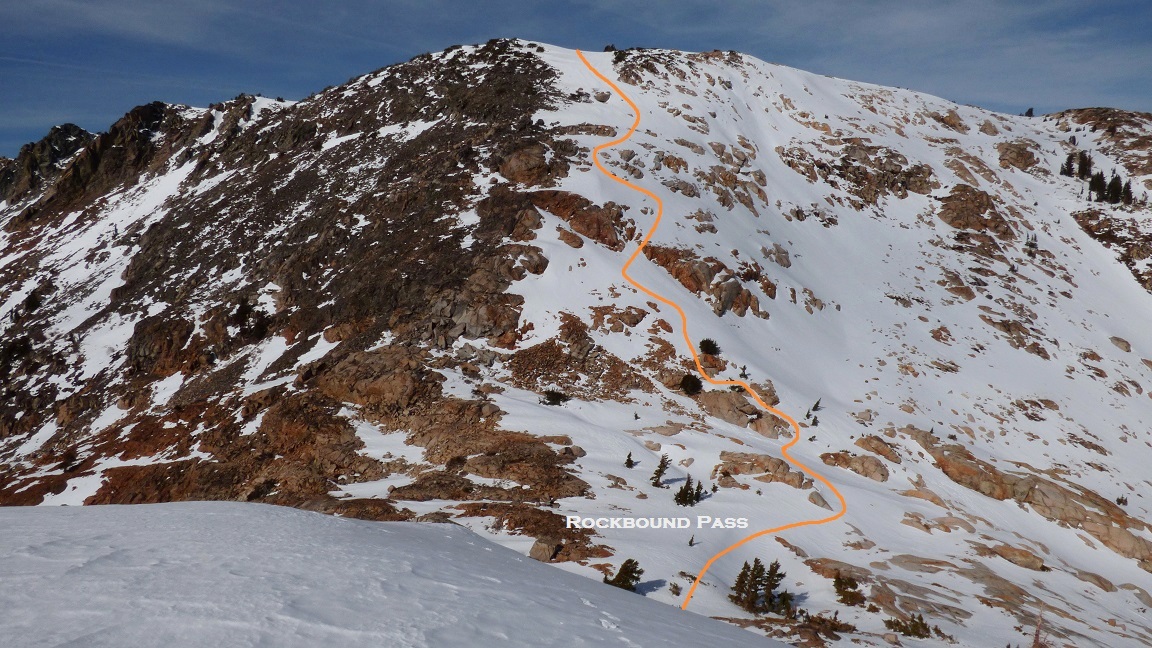
The next order of business was to continue southeast along the ridge and drop 800 ft of elevation down to Rockbound Pass. The topo map indicated steep terrain with possible cliff-outs. It turned out to be a fairly smooth descent, with continuous snow slopes fluctuating between 20 and 30 degrees.
looking down at Rockbound Pass


After a 15 minute snack break at Rockbound Pass, I continued southeast towards Rockbound Peak. Immediately southeast of Rockbound Pass, the ridge steepened very briefly, resembling a small headwall. This involved a short 40 ft section of compacted snow at 45 degrees. After climbing over the headwall, the ridge broadened and a class 1 walk remained to the summit.
the headwall

looking back at my descent to Rockbound Pass
view south-southeast from Rockbound Peak


The next peak: Muad Peak, was straightforward and relatively uneventful. Muad contained east and west summits, with the western summit being slightly higher. The short walk between the summits involved class 2 boulder hopping.
Muad's west summit viewed from east summit

The ridge from Muad to Little Pyramid began steepening, but was still very much class 1.
view south-southeast from Little Pyramid

From Little Pyramid, I had a clear view of Mt. Price and its north ridge, which would be the crux of the Crystal Range Traverse. As I descended Little Pyramid and traversed towards Price, the north ridge began looking more and more technical. I was starting to wish that I had a rope and partner.
descending Little Pyramid

Price getting closer


Now came the moment of truth. This next section of ridge would determine whether or not this traverse would be successful. The first few hundred feet of the north ridge involved a 35-40 degree snow slope. Eventually a giant pinnacle blocked my progress upward, and I proceeded to bypass it on its western (right) side. Getting to the western side of the ridge was easy. The difficulty came when I tried to get back onto the ridge. After two attempts, I was able to regain the ridge about 50 ft south of the pinnacle, climbing up a 20 ft section of class 5.4 ice covered slabs. Another 50 ft later, the ridge became dangerously corniced, and I dropped 20-30 ft down the east (left) side, then paralleled the ridge southward on 45-50 degree slopes. As the cornices disappeared, I regained the ridge, climbing snow up to 60 degrees. The remainder of the ridge after that was somewhat tedious class 2-3, but incredibly scenic. I topped out on the summit of Mt. Price at 4pm. The entire north ridge had taken around two hours.
my route up Mt. Price's north ridge

looking south from the initial slope

ascending the north ridge


view north from the summit of Mt. Price

west

south


registers

A short distance away to the south was the jagged summit of Mt. Agassiz. Getting from Price to Agassiz was all class 1. The summit block of Agassiz involved a few class 3 moves on its northern side. Although the very tippy top of Agassiz looked pointy from afar, it was actually a fairly large flat slab which could accommodate a fairly good sized group of people.
heading over to Agassiz

view north from Agassiz

southeast

register

With less than 40 minutes until sunset, I decided to begin looking for a spot to camp instead of continuing towards Aarons Peak. I located a nice slightly sloped bathtub-shaped snow bowl just 200 ft southwest of Agassiz's summit block, and immediately got to the work of sculpting out the bowl to fit the dimensions of the tent. Halfway through the process, the sun broke through the clouds and everything around me was bathed in orange light. I grabbed the camera and quickly clambered back up Agassiz. I enjoyed the brief period of sunlight before it disappeared less than 10 minutes later.


As the light faded, I headed back down and finished setting up camp before crawling into the tent to begin another 13 hours of hibernation. Despite being pretty tired, it took a couple hours of tossing and turning before I finally fell asleep, listening to the steady tinkling sounds as small chunks of ice were blown against the tent.
go to Day 3
I really enjoy this part of your trip report. I hiked up Mt Price in the early 90's from Lake Aloha and Glen Alpine in the summertime and it was one of my favorite Desolation Peaks. Your photos are amazing and it great to follow your progress through your images. Very enjoyable, keep posting, Mike
ReplyDelete