
May 3, 2014
After a very warm and dry winter, many parts of the Sierra were clearing of snow earlier than ever before. For our first Sierra peaks of the year, Tommey and I decided on a traverse of Temple Crag, Buck Mountain, and Mt. Alice. These three peaks were part of a continuous ridge extending from Mt. Alice to Mt. Sill, dividing the north and south forks of Big Pine Creek.
We planned to start from Big Pine Creek Trailhead, taking the North Fork Trail to a point between First Lake and Second Lake, leaving the trail, then taking the Contact Pass route up to Temple Crag. From Temple Crag, we would follow the main ridge northeast up and over Buck and Alice, then drop southeast off Alice into the prominent drainage separating Buck and Alice. We would follow this drainage east, soon intersecting the South Fork Trail, which we would follow north for a short distance back to the trailhead.
| Peak | Elevation | Topographic Prominence | Summit Coordinates (lat/lon) |
|---|---|---|---|
| Temple Crag | 12,976 ft | 280 ft | 37.109743, -118.491239 |
| Buck Mountain | 12,841 ft | 1,063 ft | 37.112903, -118.474459 |
| Mt. Alice | 11,617 ft | 298 ft | 37.123576, -118.465962 |
Getting to the trailhead: From Big Pine, turn west onto W. Crocker Street, which will soon turn into Glacier Lodge Rd. Travel 11 miles to the end of this road. This is the day use trailhead. The overnight parking lot can be found a half mile back on the north side of the road.
Trailhead coordinates (lat/lon): 37.125311, -118.437484
It was around sunrise by the time we hit the North Fork trail. It was great to be getting some altitude after hiking mostly lower desert peaks all winter season.
Big Pine Creek Trailhead (7,800 ft)

alpenglow on the palisades

unnamed wall near Big Kid Mountain

first view of Buck Mountain

5.2 miles after leaving the trailhead, we left the North Fork Trail between Second Lake and Third Lake where a small campground use-trail branched off to the southwest (10,100 ft), winding along a strip of land which divided the two lakes. This trail continued for a little over a tenth of a mile, ending at the outlet of Second Lake. We continued walking around the lake to its southern side, then headed south up a snowfield towards the canyon between Temple Crag and Buck Mountain. This canyon would take us directly up to Contact Pass (11,800 ft).
route to Contact Pass overview

more Temple Crag photography


heading up the canyon towards Contact Pass

The snow was firm and grippy, saving us from the immense amount of postholing we had anticipated.


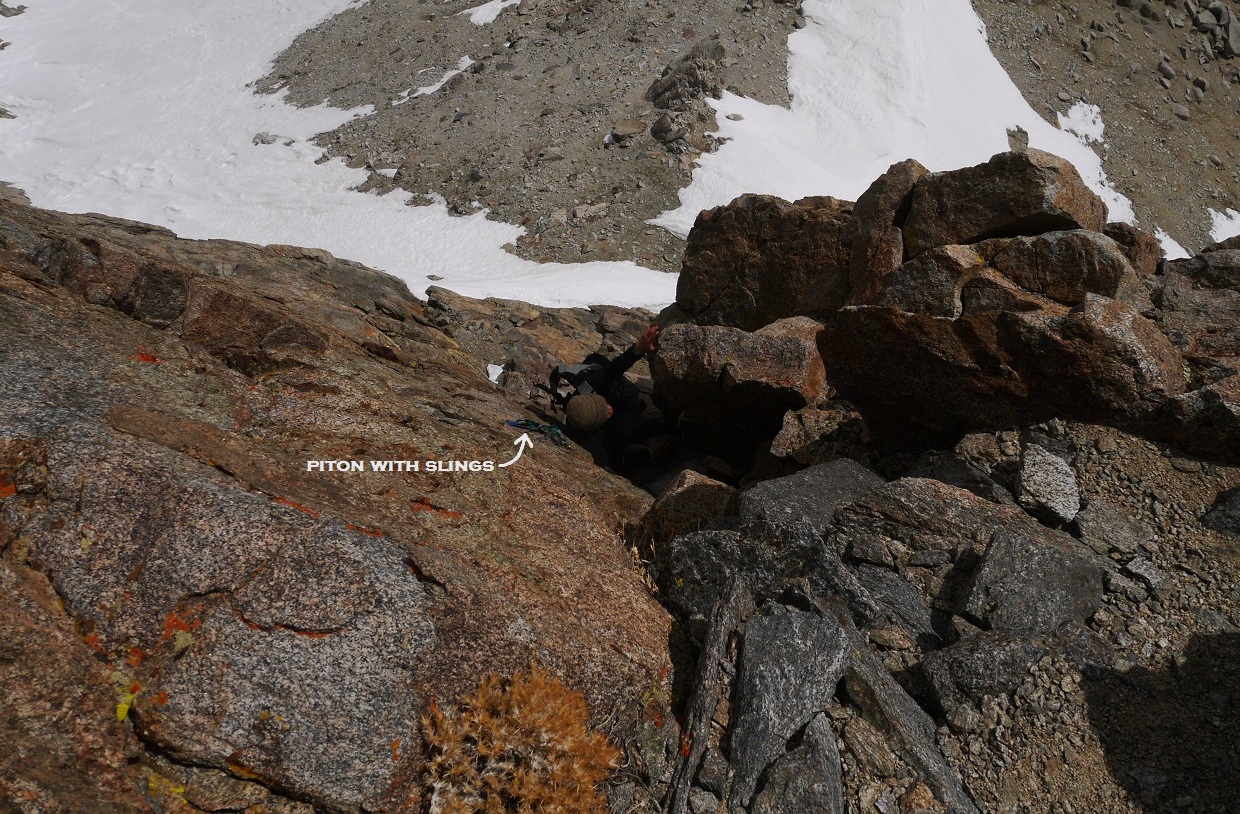
Immediately on the west side of Contact Pass was Contact Crack, a 40 ft feature rated class 5.2. This was a fun little feature with plenty of holds. At the top of the crack was a piton and some slings.

After Contact Crack and a short section of scrambling, we found ourselves standing on a large talus slope. The summit was to the west, and we promptly began slogging towards it. At this point, both of us had began to bonk. Our walk slowed into a crawl with breaks every 10-15 minutes. I was being hammered with a sporadic hacking cough, headache, and fever, all of which had appeared a few hours earlier (I later found out that it was pneumonia). Tommey had just recovered from an episode of West Nile, and had not done anything aerobic for the past two weeks. As crappy as we were both feeling, the summit looked so close, so we kept on ascending.
first glimpse of Mt. Sill

route up the talus field

The talus field soon turned into an exposed class 2-3 ridge a few hundred feet before the summit. The scrambling here was enjoyable, and I wished it could've lasted longer. The highlight was a ~5 ft gap between two large rocks on the ridge that we each had to step across. After reaching the summit, we stayed there for a little while eating and taking pictures. I was surprised not to find a register.
last bit of ridge before the summit


view SSE

west

northwest

To get back to Contact Pass, we took the standard class 3 route, heel plunging down the snow-filled gully south of the talus slope we had ascended. For the last few hundred feet before the bottom, the gully suddenly turned into class 4 ice coated rock. We were able to move to either side of the gully and parallel it down on class 3 rock. After the gully ended (11,770 ft), we kept descending the scree slope to an elevation of 11,600 ft in order to bypass a rocky outcropping between us and Contact Pass. After walking around the toe of the outcropping, it was short and sandy slog back up to Contact Pass (11,800 ft).
descent from Temple Crag seen from Buck Mountain's west ridge

After a bit of thought, both of us decided to go for Buck and Alice. Even though we were both physically drained, Buck was right there smack dab in front of us, and it would get us over to the quick sandy descent on Alice. So after a quick snack at Contact Pass, we began crawling up the west ridge of Buck Mountain.
From Contact Pass, there are 0.8 miles and 1,160 ft of elevation gain (including ups and downs on the ridge) to the summit of Buck. I tried to stay on the ridge itself (class 3) as much as possible since it contained solid rocks. Tommey stayed generally within 100 ft below the southern side of the ridge, which contained a copious amount of soft sand.
I intersected Tommey who was on the ridge by now at 12,300 ft. From here, the ridge was mostly class 2 and characterized by what resembled a big boulder pile. At last, the summit came into view. It was so windy that none of us dared stand on the summit block for more than a few seconds. Curiously, the register called the peak "Contact Peak." Looks like someone did'nt do their research. I laid down for a few minutes out of the wind, watching bright sunlight dancing on the Palisades.
Buck Mountain's west ridge seen from Temple Crag

looking towards Buck from Contact Pass

ascending west ridge

summit in view

view southeast from summit

south

northeast

From Buck, a descent of the north ridge its the easiest and most direct route to Alice. The north ridge is broad, gentle, covered with sand and talus, and not visible from the summit of Buck. To get to it, one would need to climb up and over to the left (north) side of the rocky ridge extending northeast from the summit. We ended up overshooting the spot where we were supposed to cross over the ridge, and ended up crossing over into a short gully which deposited us onto Buck's northeast face. From there, we contoured over towards the saddle (11,310 ft) between Buck and Alice.
views from descent


first view of Alice

looking back towards the short gully

Buck seen from Saddle 11,310 ft

In front of us to the northeast were a few small piles of rock which made up Alice. The hike up Alice from Saddle 11,310 ft was very easy and straightforward, containing less than 300 ft of elevation gain.

We remained at the summit of Alice for only a few minutes since it was getting late, and the constant 50mph wind was not very comfortable.
view of Buck from Alice's summit

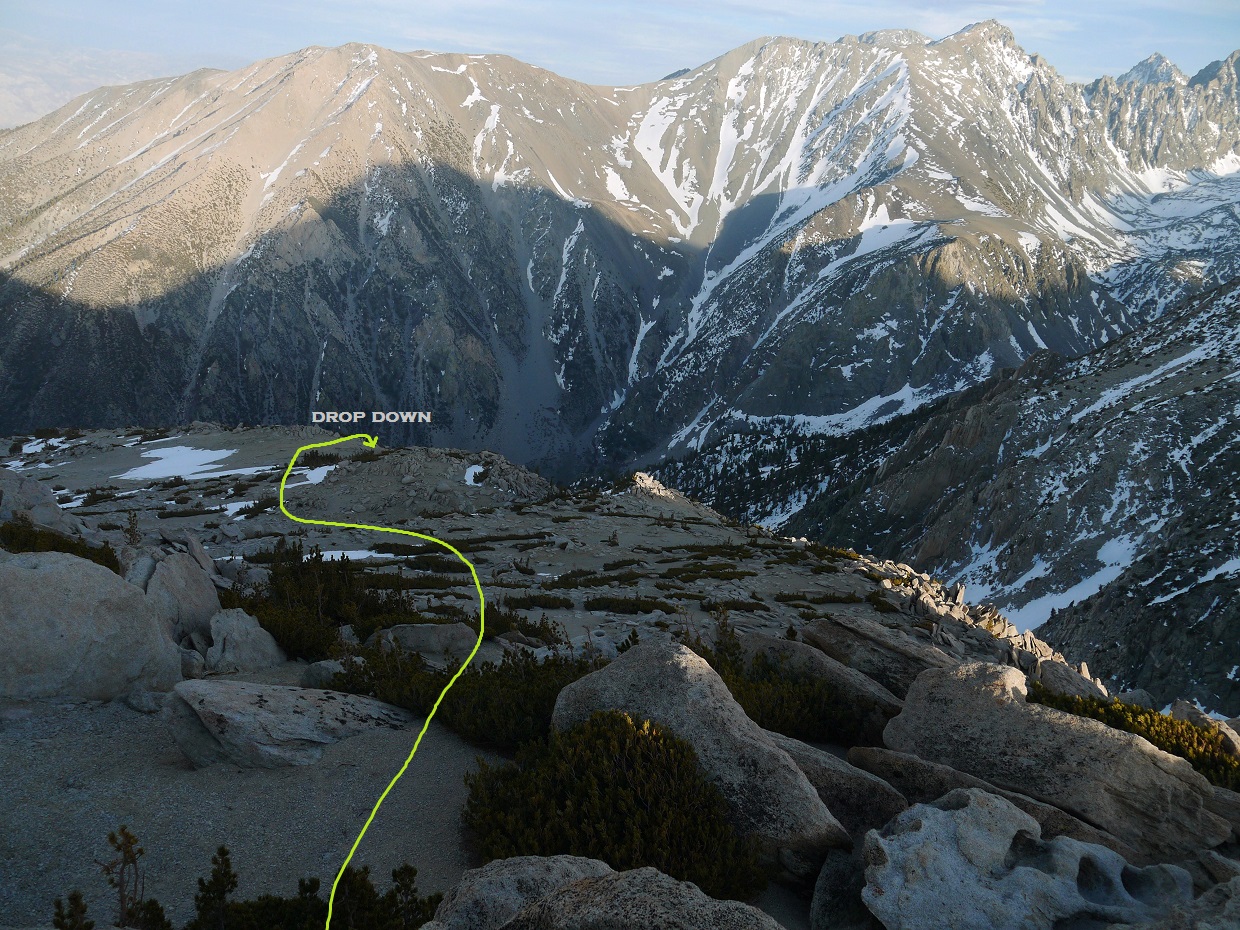
To get down from Alice, we headed southeast on the summit plateau, aiming for a distinct sandy area at the far right end of the plateau. From there, we happily heel plunged down a sandy gully to the south, which spilled out into the large drainage between Alice and Buck. This drainage headed east, and following it would take us to the South Fork Trail. As the light began fading, we made our way down the drainage, staying mainly on its left side to avoid major bushwhacking. (Later research has indicated the presence of some higher quality (sandier) descent routes on the southern half Alice's east face.) As darkness fell, we intersected the South Fork trail, turned left, and walked 1.1 miles back to Big Pine Creek Trailhead.
locating the sand gully
some Sierra Wave

The mothership has arrived! Hide yo kids. Hide yo bears. Hide yo marmots.

Final Stats
12.5 miles
7,280 ft gain/loss

Weather Forecasts
Trailhead
Second Lake to Contact Pass
all peaks
Peakbagger Pages
Temple Crag
Buck Mountain
Mt. Alice
Summitpost Pages
Temple Crag
Other
High Sierra Topix message board
I shall hide my bears but not my marmots... good riddance if you ask me.
ReplyDeleteGreat TR Eric, glad to see someone getting Sierra time!
BTW what kind of camera do you use?
I use a Panasonic DMC GF5.
Delete